Should your customer encounter a hood shake/flutter condition on 2015–2021 Chevrolet Colorado or GMC Canyon models while driving, the following steps may prove helpful in diagnosing the problem.
The concern may stem from the hood bumpers or hood latch needing adjustment.
Perform the following tests to verify:
- Open the hood.
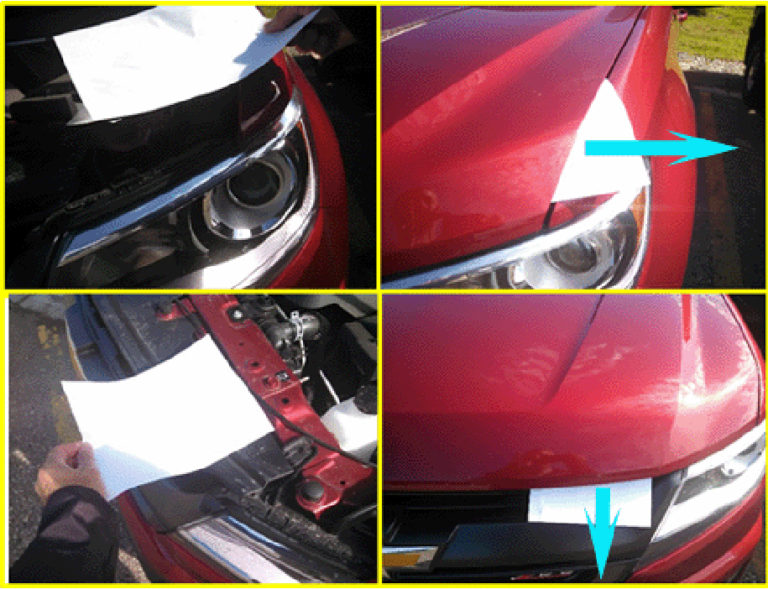
- With a piece of paper, check all six hood bumpers.
- The four outboard bumpers must have good contact and the paper should not pull free when the hood is closed.
- The two inboard bumpers must have slight clearance to the hood so the paper should pull out, but with some drag.
Note that if the paper is placed over the headlamp, it could give a false reading. The four outboard bumpers need the paper to be to the side of the headlamp and pulled over the fender. The two inboard bumpers need the paper to be to the front of the truck and pulled forward.

If the bumpers and latch are not in adjustment based on the paper test in step 2, continue with steps 3–5. If the bumpers and latch are in adjustment based on the paper holding its place in step 2, the procedure is complete. Go to steps 4 and 5.
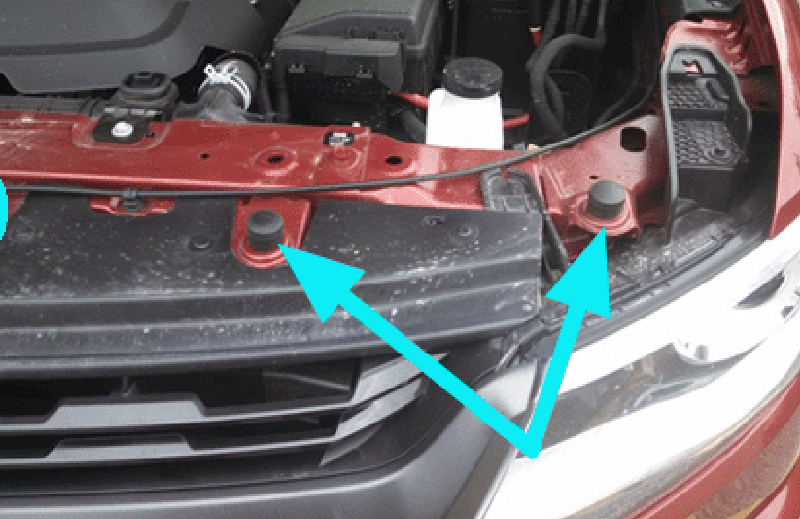
Raise the outboard hood bumpers (2 per side) until the hood is flush with the fenders. (Setting the height of the bumpers to 24mm from the bracket surface is a good starting point.) Repeat the paper test in step 2. If there is not enough contact and the hood is flush to the fenders, continue with steps 4 and 5.

- Temporarily mark the position of the hood latch. Using a 13mm ratchet or wrench, loosen the hood latch bolts just enough so that the latch will move, but is not completely free. Lightly tap the latch to lower it straight down 1mm (being careful not to move it left or right) and retighten to 22Nm (16 lb. ft.) with a torque wrench.
- Adjust the two inboard bumpers to a 23mm height from the bracket surface. Recheck these bumpers with the paper for light drag. If too tight, turn them clockwise a 1/4 turn until a light drag is achieved.
The paper test can be performed on the inner bumpers after latch adjustment. The inner bumpers should have very little to no drag to remove the paper. Then, road test the vehicle to verify the repair. If a flutter across the rear edge of the hood occurs, perform steps 6–9.
- If applicable, remove the hood insulator.
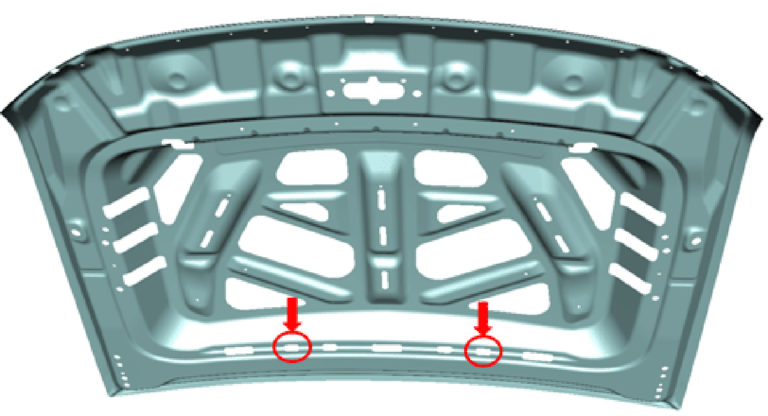
- Apply Kent® Ure-Foam Expandable Foam Sound Deadener in two locations of the hood (one per side), as shown below.

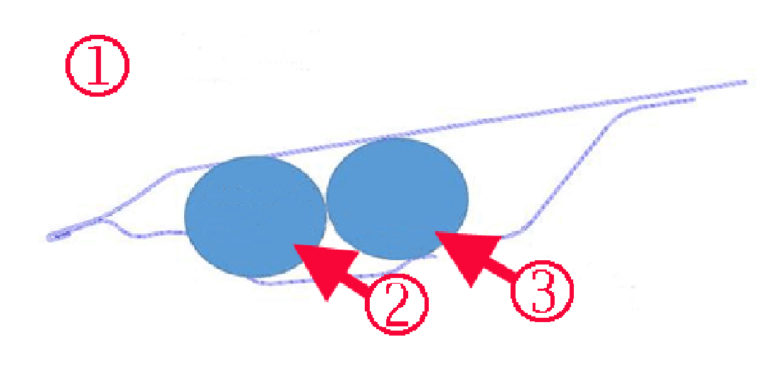
Inject foam into the second hole from the side. Aim the applicator nozzle straight to the back and begin to fill the cavity. Once half of the product has been dispensed, tilt the tip upward and slowly draw the applicator back as the last half of the foam is injected, ensuring the product is applied to the hood panel. Remove any excess foam that prevents the hood insulator from installing into the outer hole.
The graphic below shows a cross-sectional slice of the hood assembly. Apply the first half of the product in area 2 and the second half in area 3.

- Repeat step 7 on the other side of the hood.
- Reinstall the hood insulator.
For additional details and images, see Service Information Doc #PIT5340E.

